The branch where development work takes place is the master.
Set Up Your Git Environment (for first-time contributors)
Make sure you have your basic Git environment set up.
Choose an Issue
Find a bug or feature you like and can manage; nail down your JIRA ticket. If necessary, file it in JIRA.
Design Your Solution
If you are developing a feature, or you are working on a bug that involves an interface change, you'll need to go through the design phase:
| Insert excerpt | ||||||
|---|---|---|---|---|---|---|
|
Develop Your Code and Tests
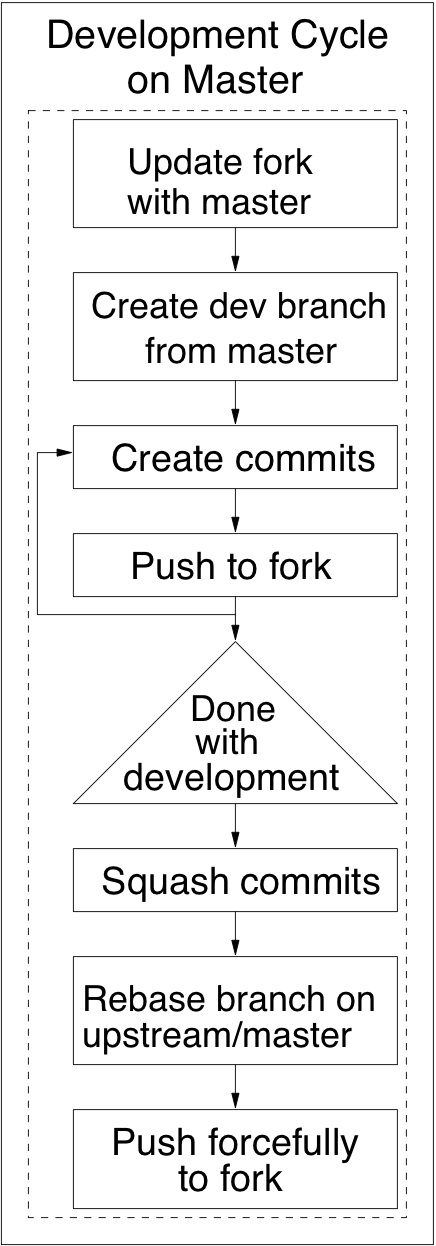
Update your fork
| Anchor | ||||
|---|---|---|---|---|
|
Update your (forked & locally cloned) repository's master branch with the golden repository's master (IMPORTANT: Your fork's master branch should not be touched with any of your development changes. It should just reflect the golden repository's master, exactly).
git checkout master git pull upstream master |
Create your dev branch
Create a development branch for the ticket that you would like to work on and name it with the JIRA ID of the ticket:
git checkout -b <JIRA ID> |
Check the development checklist
Look at the checklist for developing code.
Write your code and tests
| Anchor | ||||
|---|---|---|---|---|
|
We recommend developing your code and your tests in parallel. Your PTL tests should provide good coverage of the requirements and your design.
Put license text in headers for code and tests
| Anchor | ||||
|---|---|---|---|---|
|
If you create new source or test files, make sure that this license text is in the header for all code and test files.
Use the commit-push cycle to perfect your code
- Commit changes in the updated file to your branch with a good commit message. Make your commit message relevant and concise, so that it will be helpful to you later:
git add <updated file> git commit -m "<Commit message>" |
Tip: Commit often, perfect later.
- Push the development branch to your fork. By convention, 'origin' points to your forked repository on GitHub:
git push origin <JIRA ID> |
- Repeat the above steps until you are satisfied with your code change.
Prepare for creating a pull request
- Fetch changes made to the golden repository by other contributors. By convention, 'upstream' points to the golden repository on GitHub:
git fetch upstream |
- Rebase your development branch with new changes from the golden repository's master. 'upstream/master' is the remote tracking branch for the golden repository's (upstream's) master branch, on your local machine:
git checkout <JIRA ID> git rebase upstream/master |
- If there are conflicts, Git will throw an error message informing you so and ask you to resolve it before continuing the rebase. Resolve conflicts the same way you resolve an ordinary merge conflict in Git. Here's a way to resolve conflicts from the command line. Then, just continue the rebase operation:
git rebase --continue |
- If the conflict is complex or problematic, you can abort the current rebase operation instead of continuing, and come back to it later:
git rebase --abort |
- After the rebase is complete, you might want to clean up your branch's commit history:
- Squash all your commits into ONE SINGLE COMMIT.
git checkout <JIRA ID> git rebase -i --fork-point master |
- Write a meaningful commit message for your commit while doing the squash above. You can also use git commit --amend or rebase if you'd rather do it separately.
Now, and this is MANDATORY, sign your commit with the GPG key you configured earlier in the setup stage.
git commit -S --amend If you would rather not have to remember this step, you might choose to develop the habit of signing all your commits at all times. If you use Git v2.0+, you can also setup automatic signing.
- Finally, push the polished branch to your fork. Because you did a git rebase, you'll need to do a force push.
| git push -f origin <JIRA ID> |
Create a Pull Request
Your code changes are good to go! Go ahead and create a pull request. This allows other contributors to review your changes and provide comments. Link your issue to your pull request.
Don't forget about your pull request after you create it – inactive pull requests will be closed without warning.
Get Approval for Your Code and Tests
Your code is ready to be merged into the golden repository when the following are true:
- The code adheres to our coding standards
- You have approval from two people: one maintainer and one other contributor (who can be a maintainer); approvals for code and tests happen on GitHub inside pull requests, not the wiki
Get Changes Reviewed, and Check Them In
Address review comments from other contributors
Address review comments on your code, making changes to your development branch as necessary
- Commit new changes to the same development branch on your local machine
- Push changes to your fork, this will automatically update your pull request on Github
Make reviewing easier
To help reviewers see incremental diffs during the code review process, we recommend that you don't squash again until the code review process is complete
Squash your commits into one commit
Once you get sign-offs (at least two) on your changes, if there are multiple commits in your pull request, please squash all your change commits into a single, signed commit again.
Tell maintainers that your changes are ready to merge
Add a comment on your pull request informing the maintainers that your changes are ready to be merged into the golden repository.
Once the maintainers review the pull request, they will merge it in. Congratulations on becoming a contributor to PBS Pro!
Clean Up
Housekeeping: we strongly recommend that you delete the development branch from your forked and cloned repos now.
git checkout master git push origin --delete <JIRA ID> (deletes <JIRA ID>from the fork) git branch -D <JIRA ID>(deletes <JIRA ID>from local clone) |
Update Your Issue
Update the issue on which you were working.
| Excerpt | ||||||
|---|---|---|---|---|---|---|
| ||||||
|